Apply End Splash
Contact UsLaminate End Splash
Countertops that butt into a wall can be finished with an end splash. The end splash is basically a separate backsplash that fits between the end of the countertop and the wall.
The description below is for a standard post-formed kitchen countertop 25-1/2″ wide, with a 3″ high backsplash. The dimension of the end splash is 1-1/4″(W) X 4-1/2″(H) X 25-1/2″(L).
Basic tools required are; a power drill, drill bits, Phillips screwdriver, 3″ or larger c-clamp (quick clamp or f-clamp), and sawhorses.
Supplies needed are; pencil, masking tape, adhesive caulk, 6- #6 X 1-5/8″ Phillips head sheetrock screws, short narrow scrap piece of 3/4″ material, and rag for clean up.
How to Apply an End Splash
- Determine which end of countertop to apply end splash.
- Put the countertop on saw horses laminate side up.
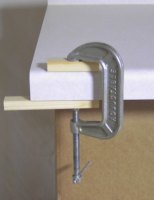
- Take a scrap piece of 3/4″ material and position parallel with and on the bottom of the nose stick leaving about 1-1/2″ extending out. Secure stick in place with clamp (Fig. 1), being very careful not to damage laminate, use some type of pad between laminate surface and clamp.
- Take end splash and hold it laminate-side toward countertop.
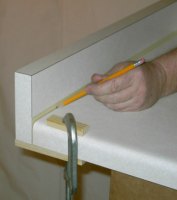
- Rest front of end splash on a stick held with a clamp while holding the front of end splash flush. Move back of end splash so the top of end splash and top of backsplash are flush. Hold in this position with one hand. Now trace around the top and bottom profile of the countertop with a pencil (Fig.2). To see the pencil line better it is recommended to apply masking tape to the laminate side of the end splash in the area that makes contact with the countertop profile.
- You should now have a perfect outline of the countertop marked on the end splash.
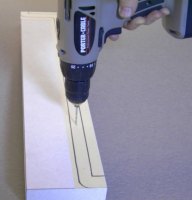
- Now mark 6 locations (4 on the 25-1/2″ dimension and 2 on the 4-1/2″ dimension) centered between lines. Use drill and drill bit the same diameter as screws to drill completely through the end return from the laminate side (Fig. 3).
- After holes are drilled wipe away the pencil line or remove masking tape on the end splash and any pencil line that may be on the countertop.
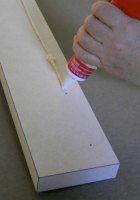
- Apply a generous amount of adhesive caulk on the end splash following the centerline of screw holes (Fig. 4).
- Rest front of end splash on the stick again. Flush front of countertop on front of end splash also the back of the end splash must be level with the top of the backsplash. Then insert the screw closest to the top of the backsplash and tighten. Care should be taken not to strip out the screws. Use a power drill with Phillips bit to start screw and tighten until snug. It is recommended to finish tightening by hand. After the screw is in place make sure the front of the end splash is still flush with the front of the countertop. It is very important to drive screws straight, so as not to raise or crack laminate on the surface of the countertop. Hold hand on laminate in area of the screw. if you feel the laminate start to lift, stop and back the screw out. Drill new hole repeat process.
- Install remaining screws with power drill and hand tighten (Fig.5).
- Remove clamp and stick.
- Clean up squeeze-out according to caulk manufacturers instructions with a rag.


